
Paav Bhaji [ Butter toasted buns with spicy mixed vegetables]

Paav Bhaji is a very popular western Indian street food where 'Paav' means bread and 'Bhaji' means vegetables.
Ingredients
Potatoes - 3 medium
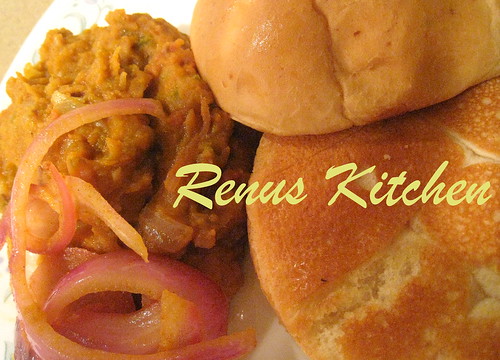
Tomatoes - 3 medium, ripe
Onions - 2 medium
Carrots - 2 medium
Green beans - 1 cup
Bell pepper - 1/2 cup, chopped
Cabbage - 1 cup, grated
Ginger - 1 inch
Lime jiuce
Green chillies - optional
Paav bhaji masala, preferably MDH brand - at least 3 tbsp*
Turmeric powder- 1.5 tsp
Cumin seeds - 1 tsp
Vegetable oil - 2 tbsp
Butter[un-salted] - 2-4 tbsp**

Method:
Boil and grate potatoes. Steam chopped carrots and beans. Chop bell peppers, green chillies, ginger, onions and tomatoes.
Heat oil [preferably butter], add cumin seeds and let it crackle. Now add chopped ginger, green chillies followed by onions and saute'.Throw in steamed carrots, beans followed by cabbage and bell pepper. Cook the vegetables till they are tender. Add pav bhaji masala,turmeric powder, salt,tomatoes and cook well. Add water to get desired consistency and bring it to boil. Occasionally mash the vegetables by the back of the ladle. Now add grated boiled potato and mix everything nicely. Cover the mixture and cook on medium heat for 15-20 minutes. Adjust for spices and turn off the gas. Squeeze fresh lime juice, add top it with some butter and garnish with onion rings. Serve it with hot pav [buns] slightly toasted with butter

Note:
*Paav bhaji masala is the key to this recipe. Keep adding until you get the desired taste. Remember, adding too much will make your bhaji little spicy
** Butter: the more the better. I personally don't add just 2 tbsp. It is often said that the bhaji tastes better with Amul butter [Indian brand butter].....and this reminds me of  wonderful Amul hoardings in my city which I grew up gazing them on my way to school...I searched for few online and wanted to share with all of you ..


Comments

Oraphan said…
Oh, these buns with spicy mixed veggies look amazingly delicious!
It sounds so simple to make, I'll definitely give it a try, thanks:)
Vrinda said…
Yummy pav bhaji,the name itself making me hungry...
Delicious looking paav bhaji...and yess....it's nice seeing these amul butter ads once again... :-)
All time favorite food, looks delicious.
shahana said…
looks delicious!!!
Tina said…
Delicious and yummy...
Malar Gandhi said…
Looks yumm' great fan of street foods:) Picture looks awesome:)
Padma said…
All time fav food. Looks yummy.
Its light & yet tasty chat.
Padhu said…
Paav Bhaji my favourite!
http://padhuskitchen.blogspot.com/
Oraphan said…
Hi Renu,

Just wanted to thank you for letting me know that you'll participate in my giveaway, can't wait to see what you'll come up with:)
Deepti said…
I m always game for Spicy bhaji with hot buttery buns...simply mouthwatering.
simplyfood said…
I stumbled across your blog purely by chance but am glad I did, your dish looks absolutely delicious.
viagra online said…
It is an amazing recipe, the contrasts in the ingredients and flavor that is ... yummy ... my family loved it!

Popular posts from this blog

Rice Kheer in Rice Cooker

Till now, I have been using rice cooker for just cooking rice. Recently I learnt that one cook toor daal (lentil soup), daal makhani and rice kheer. Since, dessert is my weakness, I thought I should start with rice kheer. Ingredients Rice - 1/2 cup Whole milk - 1.5 cups + more Raisins - 1/4 cup Sugar - 1/2 cup Cardamom powder - 1/4 tsp Ghee (clarified butter oil) - 1/2 tsp Method Rinse rice with water. Drain excess water and put rice in the slow cooker.  Pour all the milk and turn on the rice cooker and cover the lid.  It is important to stir kheer from to time to time. Add sugar. You may need to add more milk as the milk concentrates before the rice is cooked.  Once the rice cooked in milk turn off the switch. Heat ghee in a laddle. When hot add the raisins and cook on low heat till raising loook golden and pour the mixture in the kheer. Sprinkle the cardamom powder and serve cold or warm

Homemade Diwali Diyas From Dough

HA P PY DI W AL I ! !! ! This year for Diwali I made diyas [Diwali lights] at home!! They came out pretty nice ! I prepared it very simple but you can get creative by painting, glue small mirrors , beads and other stuff. Here is how I prepared: Ingredients: Whole wheat flour Water-just enough to prepare the dough Food color - yellow [optional] Method: Pre-heat oven at 200 degree Fahrenheit. Line the baking tray/dish with un-greased foil Combine flour, water and color in a bowl to prepare little stiff dough Pinch out small balls from the dough and shape it into diyas Bake it in the oven for 20 minutes [during the process I gradually increased the baking temperature to 300] Cool diyas at room temperature The diyas should feel little hard, if not just leave it in the sun Roll out some cotton wool to make wick, add some oil and light your Diya !!! Tips: While preparing the dough you can add some fresh petals to add beautiful pattern During baking, one of my...

Low Fat Baked Methi Muthia [Fenugreek Crackers] and Award Time

This is one healthy snack with goodness of fenugreek, olive oil and is baked !! This snack is ideal for someone like me who loves to much all day long:)) This is a guilt free snack which you can munch anywhere ! Ingredients: Whole flour - 5 tbsp ** Besan [gram flour] - 5 tbsp ** Kasoori Methi [Fenugreek Leaves] - 2 tbsp Cumin seeds - 1tsp Turmeric - 1/4 tsp Red chillie powder - 1/4 tsp Hing[Asfotedia] - pinch Salt to taste Olive oil - 2 tbsp Water to knead Method: Sieve all the powder ingredients including spices Now add cumin seeds, fenugreek leaves and olive oil and mix well with hands [ I have used MDH brand fenugreek leaves as I ran out of the fresh ones! Fresh leaves give better flavor and aroma ] Make a semi-soft dough using minimum water and let the dough sit covered at room temperature for 1 hour Pinch out one inch diameter balls and roll them into small thin discs [called Muthia] and place it on a greased cookie sheet Bake it in a preheated oven at...